Stage control
The HortiMaX-Go! controls the climate in your greenhouse automatically based on predefined stages.
This means that the stage settings form the basis of the (automatic) climate control program. You can program the stage settings on the stage screen. To open the stage screen, you can navigate this path, for example:  .
.
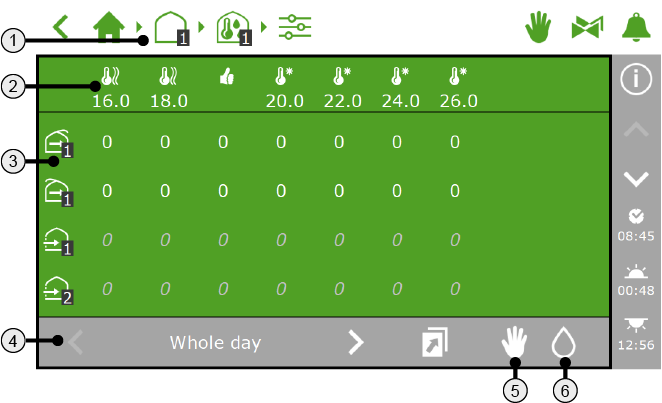
- Breadcrumb trail You can also open the stage screen directly from various control screens.

- Stages There are three types of stages: a heating stage, a neutral stage and a cooling stage. By setting the limit value of a stage, you can specify when the settings of that stage should be applied.
- Controls with specific settings The icons represent the controls of the zone you have selected. You can set the position or operating mode of a control for each stage. Read more
- Periods This displays the period(s) during which stage control will apply. Read more
- Fixed position control The settings defined for fixed position control determine whether stage control is in effect or not. Tap this icon to display the current settings for fixed position control. Read more
- Humidity control The stage screen also enables you to program the humidity settings. Tap this icon to program the humidity settings.
Breadcrumb trail
To open the stage screen, you can navigate this path for example: .
The stage settings are programmed for each zone individually. The number in the zone icon ‘ ’ indicates which zone has been selected.
Stages
You can set three types of stages:
-
 Neutral stage
This is the desired ambient temperature in the zone selected.
-
 Heating stage
If the ambient temperature drops below the limit value, then it is too cold in the zone in question. This means that the zone needs to be heated.
-
 Cooling stage
If the ambient temperature rises above the limit value, then it is too warm in the zone in question. This means that the zone needs to be cooled.
Example
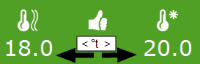
The desired ambient temperature is between 18.0 and 20.0°C. The first heating stage starts when the temperature drops below 18.0°C. The first cooling stage starts when the temperature rises above 20.0°C.
Setting number of stages
You can set multiple heating stages (up to 2) and multiple cooling stages (up to 6). This enables you to control the ambient temperature in the zones even more accurately.
Use the Number of heating stages and Number of cooling stages settings to program the number of stages. To access these settings, you can navigate this path on the display:  .
.
Setting limit value
You can adjust the limit value (temperature) of a stage.
Make sure that the limit values are not too close together. This may result in erratic control behaviour due to the stages changing too frequently.
Bear in mind the following when setting the limit values:
- The heating stages are activated once the measured ambient temperature drops below the set limit values.
- The cooling stages are activated once the ambient temperature rises above the set limit values.
Complete the following steps to set a limit value:
- Tap the stage icon for which you want to adjust the limit value: A pop-up window appears.
- Set the desired limit value.
- Tap confirm ‘
 '.
'.
You have set the limit value.
Disabling a stage
You can disable a stage.
- Tap the stage icon of the stage that you want to disable. A pop-up window appears.
- Tap the Disable Stage icon ‘
 '.
'. - Tap confirm ‘'.
All controls associated with a disabled stage are deactivated.

Figure 10: A disabled cooling stage
Controls with specific settings
On the stage screen, you can set the desired position or action for each control.
The icons of the controls are arranged vertically, one below the other, on the left-hand side of the stage screen. You can set the desired position or action for each of these controls (icons). What you can set depends on the control. This may be:
- A position between 0 and 100% (this is the case for controls with open/close outputs, such as roof ventilation, side ventilation, indoor screening and outdoor screening).
- On or off (for example, for cooling, humidification and hot-air heating).
- Automatic control (how the automatic mode works is specific to each control and depends on the equipment associated with that control).
- A value (for example, for central heating and CO2 valves).
For each control, the fixed position needs to be set to control mode ‘ '. If this is not the case, the stage settings are greyed out and are not used.
The controller does not check whether the stage settings that you have entered make sense. If the stages are not set correctly, the system may, for example, simultaneously cool and heat your greenhouse under certain conditions. That is why you should always check the stage settings that you have entered carefully.
Setting value
 Central heating
You can either set a fixed value (in °C) for the pipe temperature or select automatic mode. If you select automatic mode, then the pipe temperature is continuously adjusted to achieve the preset stage temperature.

Figure 11: Setting pipe temperature
 CO2 valve
You set a maximum value in parts per million (ppm). When this value is exceeded, CO2 supplementation stops.
You can set a different value for each temperature stage. For example: During warm weather, ventilation is high (the cooling stage is active). This means that supplementing CO2 in the greenhouse is expensive. It is usually unnecessary to supplement CO2 at night. During this period, either disable CO2 supplementation or select a very low target value.
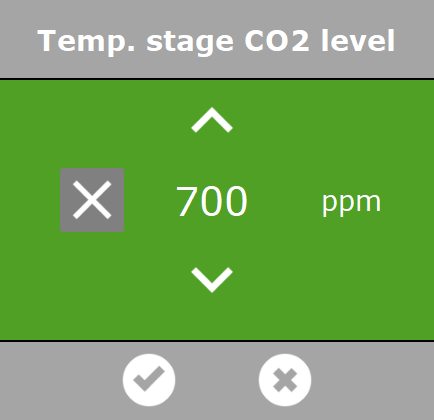
Figure 12: Setting the desired CO2 level
Periods
Use periods to vary target values throughout the day. You can set up to four periods (for each zone) per day.
To set periods, tap the period at the bottom of the stage screen. The Set periods screen appears.
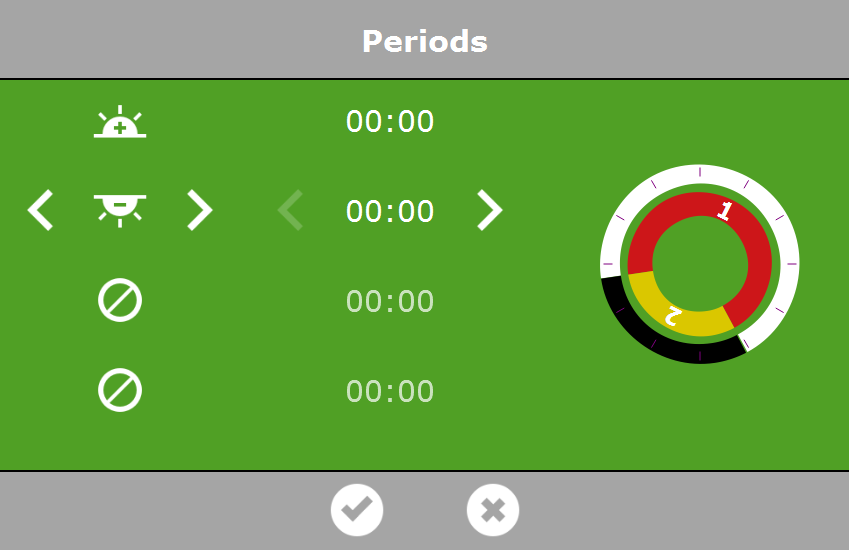
Figure 13: Setting periods
On the left-hand side of the Set periods screen, you can select the type of start time for a period. You can select a start time based on clock time, sunrise or sunset. The icons displayed have the following meaning:
|
|
Start time based on clock time |
|
|
|
|
Start time before sunrise (e.g. 1 hour before sunrise) |
|
Start time after sunrise (e.g. 1 hour after sunrise) |
|
|
Start time before sunset |
|
Start time after sunset |


The circles on the right-hand side represent the 24-hour clock. The outer circle displays the day period in white and the night period in black. The inner circle displays the set time periods. Each period is represented by a coloured section containing a number.
If periods overlap, then the highest period number applies.
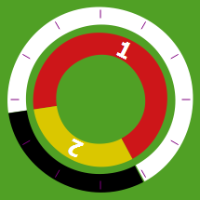
Figure 14: Periods in 24-hour clock
To set a period, proceed as follows:
- Select a time indication (clock time, sunrise or sunset).
- If applicable, enter a time.
- Tap confirm ‘'.
You have set a period.
If you delete periods and then add them again, the corresponding settings are retained. Check whether the values set for all the periods are correct.
Example
Setting day and night periods
- For period 1, select a start time after sunrise ‘
 '.
'. - For period 2, select a start time before sunrise ‘
 '.
'. - Tap confirm ‘'.
Figure 15: Setting day and night periods
Fixed position control
The stage screen displays whether a fixed position is currently in effect or not.
Open the fixed position screen (see Fixed position control) to view the fixed position settings of all zones on the same screen.
The fixed position icon is displayed on the grey bar of the stage screen.
-
 Invisible: fixed position settings are not displayed.
 -
Visible: fixed position settings are displayed one the left-hand side of the stage screen.
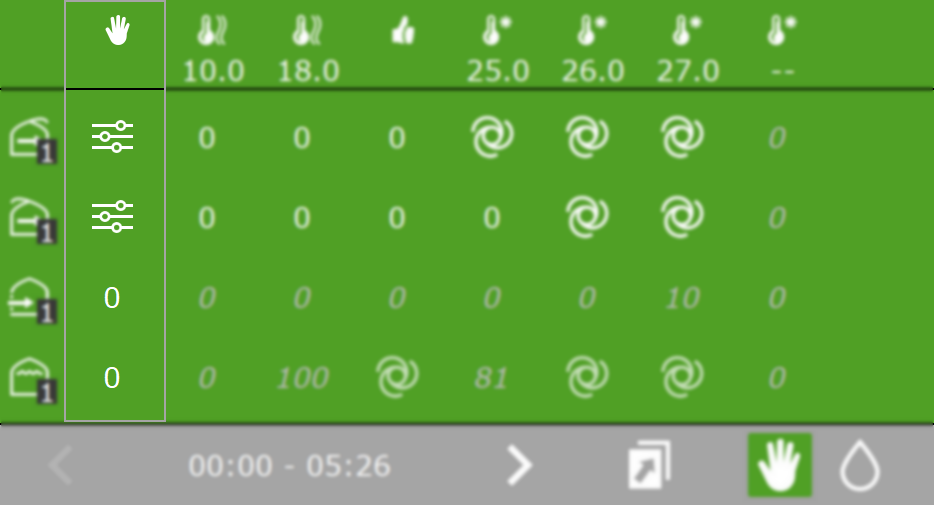
Figure 16: The fixed position settings on the stage screen
If a control is set to a fixed position, then the settings on the stage screen are not applied. To apply these settings, the fixed position must be set to control mode ‘'.
Humidity control
The stage screen enables you to program the settings for humidity control inside the greenhouse. The humidity control icon is displayed on the grey bar on the stage screen.
-
 Invisible: the humidity settings are not displayed.
 -
Visible: the humidity settings are displayed on the right-hand side of the stage screen.
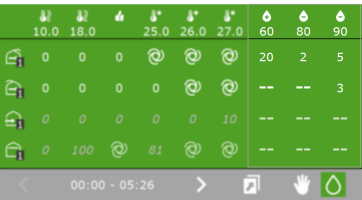
Figure 17: The humidity settings on the stage screen
Humidity control consists of two stages:
-
 The humidification stage: this means that it is too dry.
 -
 The dehumidification stage: this means that it is too humid.
As with the temperature stages, you can set a limit value (in this case, the relative air humidity (RH) in %) and you can disable a stage.
The humidity settings are programmed for each control individually.
The humidity settings for ventilation and screening are limit values. In other words, these values set the minimum or maximum positions of the vents or screens. For example: A higher or lower value may be desirable based on the current temperature, but the vent or screen position is being limited because of the current humidity level.
Example
When it is too dry or too hot in your greenhouse, you can switch on the humidification system if you have one.

Figure 18: The settings programmed for humidification control
The above settings mean that the humidification system switches on when the temperature rises above 25°C and the relative humidity (RH) drops below 60%. If the RH rises too high (above 90%), then the humidification system switches off.